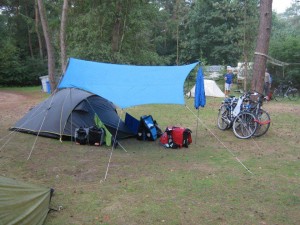
There’s a discussion over at the Facebook page for Loaded Bicycle Touring, where a member asked about the “best ways to deal with nonstop rainy conditions while bike-camping”.

Tarp-tent bike camping set up from Hendrik Christenhusz
I guess that’s a good way to pose the question, because there’s really no way to stay dry. You just have to deal with it. A few readers did have some pretty good ideas on how to diminish the impact when a deluge hits.
That’s what our camper — we’ll call him Joe — suffered, a deluge, when he set out for an overnight bike camping trip in Western Washington this weekend. Although we’re famous for precipitation, it’s usually the drizzle variety. Sunday’s rainfall broke a record for the date.
After 24 hours of nearly constant rain, Joe packed up all his wet stuff and that added a lot of water weight to his rig. He thinks the added weight may have contributed to a couple of flats on the way home.
Fortunately, he was heading home, not another campground in a long-distance bicycle trip.
Laundromats
My buddy and I ran into plenty of rain in the first half of our cross-country bicycle tour. We came up with a couple of strategies that worked OK.
1. When we got hit by overnight showers, we would try to dry out our stuff in the morning on a boulder or picnic table before re-packing it.
2. If that wasn’t possible because it continued raining, we would stop in the next town, shake as much of the dirt off our tent as we could, and throw it in a dryer on a low setting. Same with sleeping bags. Got to remember the low setting, though, as man-made fibers could melt.
We just didn’t want to carry a bunch of wet gear in our panniers, because we wanted to avoid a crop of mildew.
More ideas
But this is the 21st century. Surely there are better schemes to beat the rain now. Here are some offered by readers of Loaded Bicycle Touring.
3. Carry an extra tarp and extra bungee cords. Stretch out the tarp first, then pitch your tent (or hammock) underneath.
4. Another reader got more specific: Use a 380 gram tarp (that’s just shy of a pound). Set it up first, then pitch a 2- or 3-person tent underneath. If it’s sunny, that tarp offers shade.
5. Forget the tent and use a hammock. Those who used hammocks say that with the tarp over the top, you don’t have to worry about water seeping into the tent from underneath.
Lightweight tarps are not cheap. The Pro Fly Rain Tarp, Olive (FFP) costs $79 at Amazon. The Kelty Noah’s Tarp Shelter
goes for $59 to $99. The Superfly is made for hammocks, and goes for $130. This Twing tarp runs $300 and the Zing runs $400. How much is it worth to you to stay dry?
6. Once your tent (and tarp) is up, unpack your panniers so everything stays dry. (I guess you’d want to pack your panniers so you could get to the tarp and tent first.)
7. Have you ever seen one of these on the road? Me neither. The Kamp-Rite Midget Bushtrekka Bicycle Camper Trailer with Oversize Tent Cot
will cost you more than $800. And it weighs more than 60 pounds. But there is the convenience of popping the top and climbing right in.
8. Other ideas: Stay in a motel or go bike camping in Southern California. Good ideas, I guess, but not exactly practical.


2 comments
I have the Kelty Noah and it is very heavy. I rarely use it. It’s best just to buy a $10 tarp that is at least 8’10’…but you can also use a dry pitch tent. Many tents are dry pitch these days. You can set the fly up with the poles, then get beneath it to set up the tent. I recommend good waterproof panniers like Ortlieb. If you camp at a park with restrooms, you can always dry stuff under the hand dryer. I have done this many times. The worst part is taking down a tent in the rain. A tarp is a must, and I never leave home without it. If it doesn’t rain, you can always use it as a picnic table cloth or a “rug” in front of your tent door.
Author
Great idea on the hand dryer. I’d forgotten about that. I’d probably opt for the inexpensive tarp as well.